I recently decided that it might be fun to make a pinhole camera, as a little experiment. Having never made one before I decided that I would make a matchbox pinhole camera, as described on the following site:
http://www.matchboxpinhole.com/
So I carefully assembled the various pieces, which were all very inexpensive, in-fact the most expensive item was the roll of 35mm film, which was £4.99.
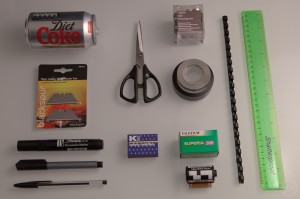
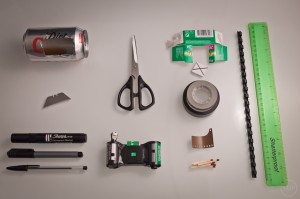
The items I needed were as follows:
* A matchbox;
* Roll of 35mm film;
* An empty roll of 35mm film with at least 1cm of film sticking out;
* Some thin cardboard;
* Empty can of coke;
* Black electrical tape;
* A plastic spiral binder;
* A thin sewing needle/pin;
* Scissors;
* Craft knife;
* Black marker pen;

Pinhole camera ingredients
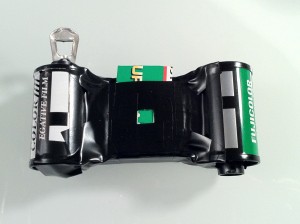
I would estimate that following the very simple instructions available on http://www.matchboxpinhole.com/ it only took me about 30 minutes or so to assemble (in my mind’s eye I resembled MacGyver, creating something incredible from next to nothing). It was all very painless and in no time at all I had created my very own, tiny, pinhole camera.

Pinhole camera complete

Matchbox Pinhole Camera
Now armed with my newly assembled camera I was keen to take some photos, but sadly by this point it was getting rather late in the day and perhaps more importantly, rather dark. So I reluctantly decided that I would have to wait until the following day before capturing my prize winning shots!
Sadly the world had other plans for me and for the next two days I didn’t get an opportunity to get out and about with my camera during daylight hours. So I decided that on the weekend I would be out with my pinhole camera come wind, rain or shine.
As it turned out the weekend was absolutely lovely, so I set off with my DSLR camera and my pinhole camera in an effort to find something worthy of the use my 35mm film. Shooting on film is something I haven’t done for a long time and it was a rather unique feeling to actually have to stop and consider the 24 shots I had available. As I typically shoot digital I am free from the shackles of film, but in a way, knowing that you only have a finite number of shots and that the moments would perhaps have to be picked somewhat more carefully than normal was actually quite refreshing.
I had read the instructions on the matchboxpinhole.com website and understood that exposure when outside should be somewhere between 1-2 seconds and that it was best to take at least three shots of each subject at varying exposure lengths, in an effort to try and ensure a useable shot. As it turns out, this is extremely good advice!
So with the above information in mind, taking three shots for each subject would leave me with approximately eight actual shots to take. I headed to the beach and set about taking a number of shots, at one point I felt sure I had broken the camera but I continued on anyway, just in case. Another problem was that I was using a ring pull to wind the film into the empty canister and after only a couple of photos the plastic lugs started to break, which made the winding rather difficult. I persevered and after taking a few shots at the beach I headed to the forest to capture a few final photographs.
Once I had finished the roll of film I wound the film back into the correct film canister and looked forward to seeing how my shots would turn out. This was Saturday evening, so I would now have to wait until Monday at the very earliest before I could get my film developed. I did consider developing the film myself, but decided that by the time I had bought all of the chemicals I would have spent a reasonable amount of money and would still have to wait for the items to arrive by post. I decided I would get this film developed and look to process the next film myself.
On Monday morning I took the film to a local one hour processing facility, making sure to let the person behind the counter know than the film was shot on a pinhole and that the spacing of the shots may be irregular. She was very helpful and told me she would be super careful. I now had to wait patiently for an hour in order to see how good (or more likely, rubbish) my photos were going to be. One of the problems with the basic pinhole I had created was that it did not have a viewfinder, so it was rather difficult to work with composition. It was really just a case of pointing it in roughly the direction I wanted to capture and hoping for the best. My next pinhole camera will certainly need to have a viewfinder built into it!
Well one hour later I got my shots and feverishly unwrapped them to discover that they were in fact… rather terrible. They were mostly overexposed and the composition was not great. One of the biggest problems for me was judging the distance I needed to be from my subject. It turns out that I need to be much closer to the subject than I had imagined and I also needed to expose the shot for closer to a second and no longer. Well, it’s fair to say I was disappointed with my shots but I won’t be deterred. I’m going to make another pinhole camera, but this one will be more sophisticated (i.e. with a viewfinder) and being armed with the experience of the first camera I may even get a half decent shot!
Oh and here are a couple of the shots from my first pinhole camera attempt.
Making a pinhole camera is cheap, very easy and lots of fun. It can make you think about your photography in new ways, especially if you are used to shooting with digital. It’s well worth having a go and who knows, unlike me, you may even get some great shots on your first attempt!
Happy shooting!


 Flickr
 Twitter


