Twitter always seems to be on top of the latest news stories and has made a number of internet celebrities along the way. Most notably perhaps Janis Krums’ photo of the U.S. plane that crash landed in New York’s Hudson River in January 2009.
Yesterday another internet celebrity was born as Nasa launched the space shuttle Endeavour for the very last time and Stefanie Gordon happened to be descending on her flight from New York to Palm Beach. Using her iPhone she was able to catch the following shot which subsequently went viral:

Image © Stefanie Gordon
Mashable have the full story but here is a brief extract:
When Stefanie Gordon boarded her plane in New York City to visit her parents in Palm Beach, the captain noted there was a chance passengers would witness the space shuttle Endeavour’s last launch during the flight. But she never expected to play a role in documenting it.
As the plane descended toward Palm Beach and the Endeavour’s launch became visible, Gordon pulled out her iPhone and snapped a few photos and a short video. On the ground, she posted one of the photos to her then 1,800 Twitter followers.
In a few hours, she was fielding phone calls from ABC, the BBC and CNBC. She had accumulated about 1,000 new Twitter followers, and she had to turn the @mention push notifications off on her phone so they wouldn’t drain the battery.
from: mashable.com/2011/05/16/endeavour-launch-twitpic/
What an incredible shot and it just goes to show the possibilities that are offered by combining a smartphone with social media and a spot of good fortune!
Happy shooting!
Related Posts:
A very quick post to say that Sunday May 8th is Mother’s Day in the States (it was back in March for those of us living in the UK) and Slate Magazine have published a bunch of photos of mothers to celebrate the day.
I really enjoyed viewing them and thought that you might just enjoy them too. I particularly enjoyed the images below:

© Elliott Erwitt / Magnum Photos

© Alex Majoli / Magnum Photos
You can view the full gallery of 26 images on Slate Magazine on the following URL: todayspictures.slate.com/20110506.
Happy Mother’s day and of course, happy shooting!
Related Posts:
I recently decided that it might be fun to make a pinhole camera, as a little experiment. Having never made one before I decided that I would make a matchbox pinhole camera, as described on the following site:
http://www.matchboxpinhole.com/
So I carefully assembled the various pieces, which were all very inexpensive, in-fact the most expensive item was the roll of 35mm film, which was £4.99.
The items I needed were as follows:
* A matchbox;
* Roll of 35mm film;
* An empty roll of 35mm film with at least 1cm of film sticking out;
* Some thin cardboard;
* Empty can of coke;
* Black electrical tape;
* A plastic spiral binder;
* A thin sewing needle/pin;
* Scissors;
* Craft knife;
* Black marker pen;

Pinhole camera ingredients
I would estimate that following the very simple instructions available on http://www.matchboxpinhole.com/ it only took me about 30 minutes or so to assemble (in my mind’s eye I resembled MacGyver, creating something incredible from next to nothing). It was all very painless and in no time at all I had created my very own, tiny, pinhole camera.

Pinhole camera complete

Matchbox Pinhole Camera
Now armed with my newly assembled camera I was keen to take some photos, but sadly by this point it was getting rather late in the day and perhaps more importantly, rather dark. So I reluctantly decided that I would have to wait until the following day before capturing my prize winning shots!
Sadly the world had other plans for me and for the next two days I didn’t get an opportunity to get out and about with my camera during daylight hours. So I decided that on the weekend I would be out with my pinhole camera come wind, rain or shine.
As it turned out the weekend was absolutely lovely, so I set off with my DSLR camera and my pinhole camera in an effort to find something worthy of the use my 35mm film. Shooting on film is something I haven’t done for a long time and it was a rather unique feeling to actually have to stop and consider the 24 shots I had available. As I typically shoot digital I am free from the shackles of film, but in a way, knowing that you only have a finite number of shots and that the moments would perhaps have to be picked somewhat more carefully than normal was actually quite refreshing.
I had read the instructions on the matchboxpinhole.com website and understood that exposure when outside should be somewhere between 1-2 seconds and that it was best to take at least three shots of each subject at varying exposure lengths, in an effort to try and ensure a useable shot. As it turns out, this is extremely good advice!
So with the above information in mind, taking three shots for each subject would leave me with approximately eight actual shots to take. I headed to the beach and set about taking a number of shots, at one point I felt sure I had broken the camera but I continued on anyway, just in case. Another problem was that I was using a ring pull to wind the film into the empty canister and after only a couple of photos the plastic lugs started to break, which made the winding rather difficult. I persevered and after taking a few shots at the beach I headed to the forest to capture a few final photographs.
Once I had finished the roll of film I wound the film back into the correct film canister and looked forward to seeing how my shots would turn out. This was Saturday evening, so I would now have to wait until Monday at the very earliest before I could get my film developed. I did consider developing the film myself, but decided that by the time I had bought all of the chemicals I would have spent a reasonable amount of money and would still have to wait for the items to arrive by post. I decided I would get this film developed and look to process the next film myself.
On Monday morning I took the film to a local one hour processing facility, making sure to let the person behind the counter know than the film was shot on a pinhole and that the spacing of the shots may be irregular. She was very helpful and told me she would be super careful. I now had to wait patiently for an hour in order to see how good (or more likely, rubbish) my photos were going to be. One of the problems with the basic pinhole I had created was that it did not have a viewfinder, so it was rather difficult to work with composition. It was really just a case of pointing it in roughly the direction I wanted to capture and hoping for the best. My next pinhole camera will certainly need to have a viewfinder built into it!
Well one hour later I got my shots and feverishly unwrapped them to discover that they were in fact… rather terrible. They were mostly overexposed and the composition was not great. One of the biggest problems for me was judging the distance I needed to be from my subject. It turns out that I need to be much closer to the subject than I had imagined and I also needed to expose the shot for closer to a second and no longer. Well, it’s fair to say I was disappointed with my shots but I won’t be deterred. I’m going to make another pinhole camera, but this one will be more sophisticated (i.e. with a viewfinder) and being armed with the experience of the first camera I may even get a half decent shot!
Oh and here are a couple of the shots from my first pinhole camera attempt.


Making a pinhole camera is cheap, very easy and lots of fun. It can make you think about your photography in new ways, especially if you are used to shooting with digital. It’s well worth having a go and who knows, unlike me, you may even get some great shots on your first attempt!
Happy shooting!
Related Posts:
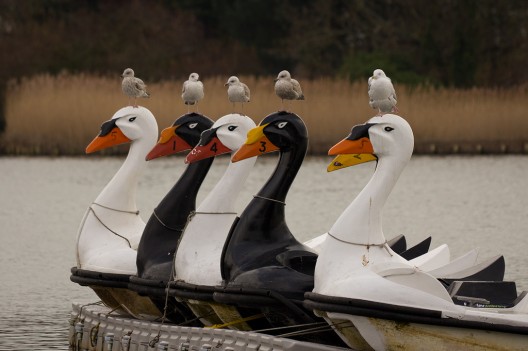
Just a very quick post to share a photo I took while driving home this afternoon.
I spotted these seagulls resting on the heads of some floating swan rides and immediately had to stop the car to get the shot. A random passer by looked at me with my camera and then looked out to where my lens was pointing and remarked “That’s really funny, I just wish I’d brought my camera out today”.
So it just goes to show that it’s always worth having a camera handy if possible to capture those quirky unexpected moments.
Have a great weekend!
Related Posts:

I was recently reading the fascinating story of Vivian Maier (1926-2009) and wanted to take a moment talk about her here.
Vivian Maier’s photography has only recently come to light following her death in 2009. Details are still scarce but it is know that Vivian Maier worked as a nanny in Chicago for approximately 40 years starting in the 1950s. She was by all accounts a very private individual who would spent much of her free time exploring the streets of Chicago taking photos with her Rolleiflex camera, which she subsequently never showed to anybody. Oh and it also turns out that she may well have been one of the finest street photographers of the 20 century.
Vivian Maier’s work was discovered at an auction house in Chicago shortly before her death. It is believed that she fell upon hard times later in life and may have actually been homeless for a period of time. It is understod that the photographs and film were recovered from a storage locker when she had failed to maintain the rental fees and were subsequently sold at auction.
The photos were bought by John Maloof in 2007 and consisted of 100’000 medium format negatives, thousands of prints and undeveloped rolls of film. There is some debate and interest regarding the circumstances surrounding the discovery and emergence of the work shortly after her death and I’m sure that this will continue for the foreseeable future but what is clear however is that her work is striking and since being made available to the public in 2008/2009 has received critical acclaim.
Vivian Maier’s work consists predominantly of black and white street scenes of Chicago taken during the 1950s and 1960s, often depicting the less privileged individuals of the era. I easily managed to spend a couple of hours looking at her work on John Maloof’s blog dedicated to Vivian’s work. The shots are absolutely fascinating, even more so because they are from a period in time that I have did not experience, these shots really give you a feel for and an insight into what life must have been like for some of these people.
I find it incredible that such a large body of work was possibly never shown to anybody and also sad that this collection may now potentially be worth a fortune but the artist herself may have died without any recognition and very possibly without a penny to her name.
Some examples of Vivian Maier’s work


Vivian Maier’s work can be seen on John Maloof’s blog and the exciting thing is that there is still plenty more to come in the future as more negatives are developed and uploaded.
http://vivianmaier.blogspot.com/
There was also an interesting article regarding Vivian Maier on the BBC News site:
http://www.bbc.co.uk/news/world-us-canada-12247395
Take a look at the official blog and let me know what you think about the work.
Related Posts:
I’m a huge fan of Flickr and something I’ve noticed more and more recently when viewing users work is the adoption of HDR photography techniques.
For the uninitiated, HDR stands for high dynamic range and essentially enables a photographer to produce an image with a far greater range of luminance than would otherwise be possible. That is to say an image with far more detail in both the dark and light areas by combining three (or more) exposures of the same scene together and then tone mapping them to produce the best result.
HDR is popular is because the sensor in a digital camera is unable to capture the full dynamic range of a scene that can be perceived by the human eye. By using HDR photography it is possible to address this issue and produce a photograph that more accurately represents that scene that the photographer witnessed and avoid losing detail in the darkest or lightest parts of the scene.
Any camera that allows over or under exposure of a photo can be used to create a HDR image and many cameras now come with auto exposure bracketing which allows all of the shots required for the HDR to be created automatically. This technique is even available on the iPhone now.
Some example HDR images


The HDR examples above are from Trey Ratcliff’s stuckincustoms.com. Trey is probably the most well-known HDR photographer around and you should take a look at his site to see more examples of his work and information regarding HDR photography.
So HDR photography sounds great, right? Especially if the end result is images that more accurately represent the scene? Well I have mixed feelings about HDR photography and I’ll explain why below.
I have played with HDR photographs in the past with varying degrees of success and I believe that HDR photography is a great idea and certainly has its benefits. As photographers it enables us to produce more accurate results, bringing life to an otherwise flat photo and potentially producing a more pleasing result. But as they say, with great power comes great responsibility and unfortunately HDR is very easily abused. The problem I have with it is that people often take it to the extreme, tone mapped images have become very prevalent, you only need to perform a quick search Flickr for HDR to see examples of vastly oversaturated images that literally hurt your eyes to look at and to me at least look more like abstract paintings than photographs. This is not so much a problem with the HDR technique as it is with the application of the technique. Photographers are sometimes guilty of using HDR with otherwise unremarkable shots in an attempt to add interest artificially.
I guess this ultimately boils down to a question of judgement and artistry and while I can certainly see why HDR images appeal to people, I personally find many of them rather difficult to appreciate. I’m sure as photographers we have all bumped the saturation of an image up or down to produce a more pleasing result and I don’t have a problem with this. I guess there are different schools of thought when it comes to post processing and I firmly believe that post processing is absolutely fine and the important thing is that the photo has a pleasing end result rather always recording the scene exactly as it was. However when the end result is not pleasing and images all begin to look alike is when I have a problem with it. Unfortunately much of the HDR photography I have seen recently has the over-processed/artificial look.
I do believe that HDR has its place in a photographers repertoire, it’s something we should know about and understand but I can’t help but feel that subtlety is key and for a HDR image to be truly effective the viewer should perhaps not even realise they are looking at a HDR image.
I’m sure that this kind of question will divide opinion and of course there is no definitive answer, it is a subjective thing after all as with other art forms. But I’m interested to know what you think, is HDR photography hot or not?
Related Posts:

I have been fascinated by photography for as long as I can remember.
I find myself consumed by thoughts of photography and while not taking shots I’m spending time reading about photography, looking at the work of others and listening to as many photography podcasts as I can find. I seem unable to walk past a store without picking up a new photography magazine or book and of course I’m always looking for new a photo blog to digest.
The things that appeal most to me about photography is that there is always something new to learn, something that you may previously have never considered and inspiration is absolutely everywhere. Photography helps you to see the world a little differently, as a photographer you notice things that others don’t and find beauty in some of the most unlikely places.
Photography has the potential to be both highly technical and highly creative and creating a personal photography blog seems to be the most natural place to converse with likeminded people, share some of my own photography and write about my thoughts on the ever evolving world of photography.
Find me on Twitter & Flickr and feel free to leave a comment.